
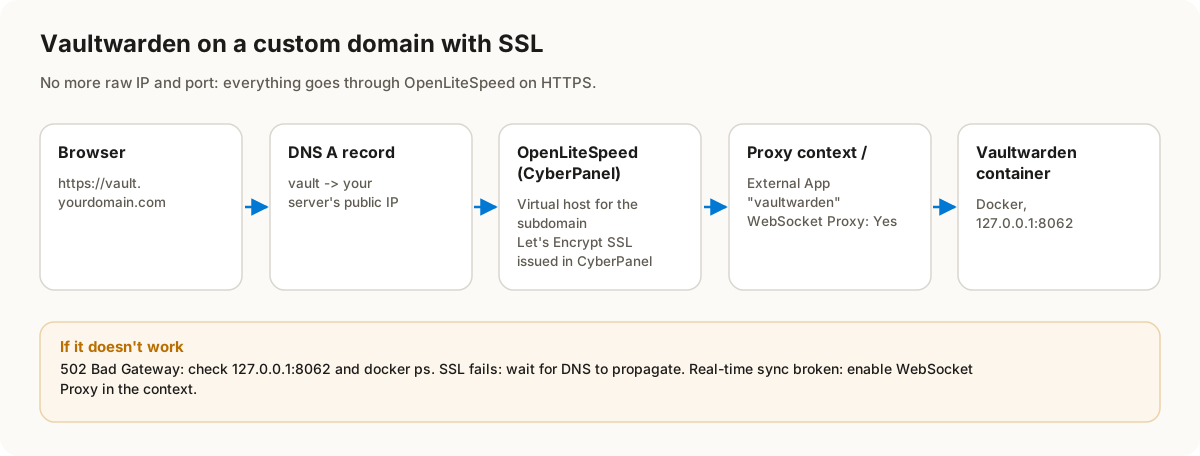
If you’ve deployed Vaultwarden in Docker and want to access it securely via a custom domain (like vault.yourdomain.com) instead of an IP and port, this step-by-step guide will help you achieve it using CyberPanel and OpenLiteSpeed.
In this tutorial, I’ll show you how to expose Vaultwarden (running on http://<server-ip>:8062) under a subdomain with SSL encryption.
✅ Prerequisites
- A server with CyberPanel installed (includes OpenLiteSpeed).
- Docker running Vaultwarden container.
- A registered domain with control over DNS.
- Access to your DNS provider.
1. Configure DNS for Your Subdomain
First, point your subdomain to your server:
- Log into your domain registrar/DNS provider.
- Create an A Record:
- Host/Name:
vault - Value: your server’s public IP (e.g.,
123.123.123.123). - TTL: Default (300 seconds is fine).
- Host/Name:
Test with:
dig vault.yourdomain.comIt should return your server’s IP.
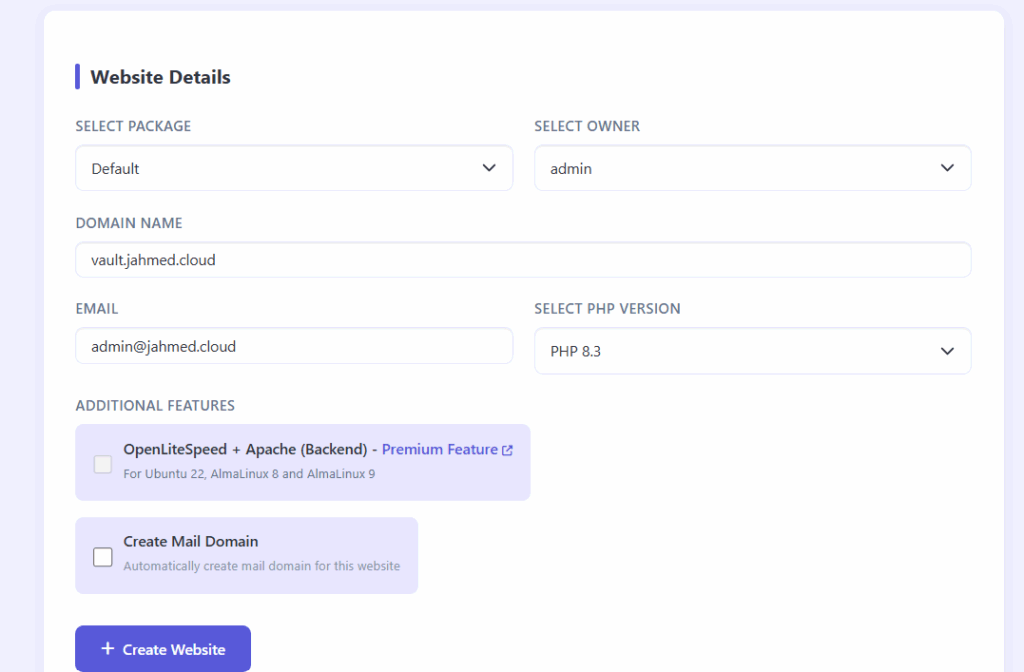
2. Create Website for the Subdomain in CyberPanel
- Login to CyberPanel:
https://<your-server-ip>:8090. - Go to Websites → Create Website.
- Enter details:
- Domain:
vault.yourdomain.com - Owner:
adminor any user - PHP Version: Any (not used for proxy)
- Domain:
- Click Create Website.
[Screenshot: CyberPanel Create Website Page]
CyberPanel will generate a virtual host for this subdomain.
3. Setup Reverse Proxy in OpenLiteSpeed
CyberPanel uses OpenLiteSpeed (OLS). We’ll configure OLS to forward requests from vault.yourdomain.com → Vaultwarden container.
- Open OLS admin panel:
https://<your-server-ip>:7080- Login with the credentials set during CyberPanel install.
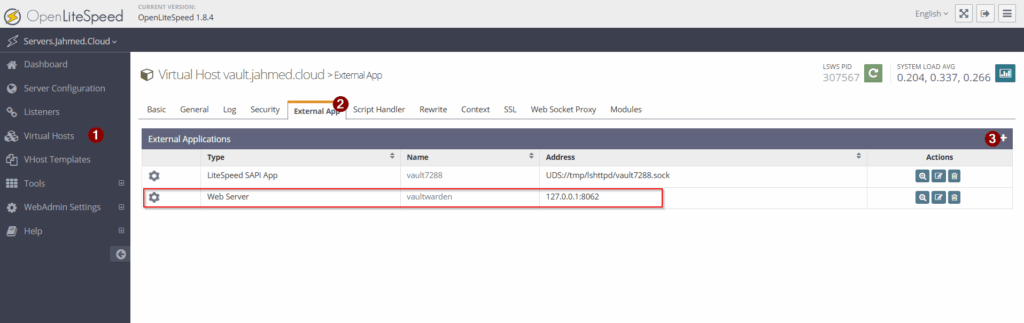
Add External App
- Navigate: Virtual Hosts → vault.yourdomain.com → External App → Add.
- Fill in:
- Type: Web Server
- Name:
vaultwarden - Address:
127.0.0.1:8062 - Leave other defaults → Save.
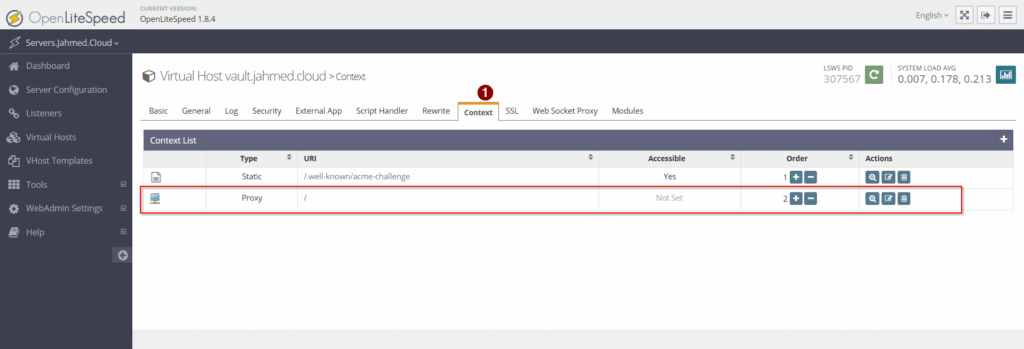
Add Proxy Context
- Still in
vault.yourdomain.comvhost → Context → Add. - Fill in:
- Type: Proxy
- URI:
/ - External App:
vaultwarden - Enable WebSocket Proxy: Yes (important for Vaultwarden real-time features)
- Save.
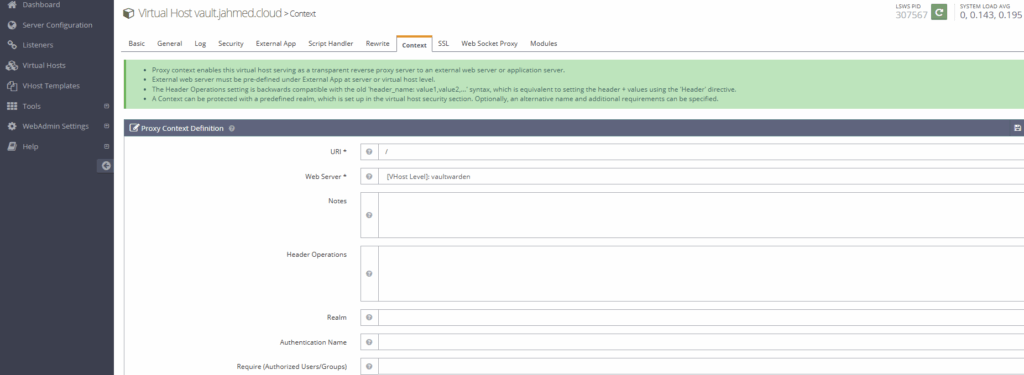
- Restart OLS gracefully from the top menu.
4. Enable SSL for Your Subdomain
Back in CyberPanel:
- Go to Websites → List Websites → vault.yourdomain.com → Manage.
- Scroll to SSL → Issue SSL.
- CyberPanel will request and install a free Let’s Encrypt SSL certificate.
Now your Vaultwarden will be available securely at:
5. Test Your Setup
- Open browser:
https://vault.yourdomain.com→ Vaultwarden login page should load. - Run a quick check from the server:
curl-v http://127.0.0.1:8062/You should see Vaultwarden HTML output.
- Logs for debugging:
- OpenLiteSpeed logs:
/usr/local/lsws/logs/error.log - Vaultwarden logs:
docker logs vaultwarden
- OpenLiteSpeed logs:
Troubleshooting Tips
- 502 Bad Gateway: Check that
127.0.0.1:8062is correct. Rundocker psand confirm Vaultwarden is mapped. - SSL issue: Ensure DNS propagation completed before issuing SSL.
- WebSockets not working: Confirm WebSocket Proxy is enabled in OLS context.
Final Result
Your Vaultwarden instance is now secured and accessible via your custom domain:
https://vault.yourdomain.com
All traffic is encrypted with Let’s Encrypt, and you no longer need to expose raw IP + port.
Why Use CyberPanel for Proxying?
- Free SSL management via Let’s Encrypt.
- Easy domain/subdomain handling.
- Built-in OpenLiteSpeed reverse proxy.
This makes CyberPanel a great companion when hosting Dockerized apps like Vaultwarden.